Enabling Universal Design of Learning in Music Education with 3D Printing

I feel that the biggest challenge facing educators is how to best deal with marginal students. My marginal students - the ones who have attention issues or behavior issues or even just simple attitude issues - perfomed better when they have more support to access the learning. Not all supports are equal, but I noticed I was able to get more consistent results when they had access to “walls that teach.”
Walls that teach refers to a concept of visual reference materials posted around the classroom. Number lines. Alphabet charts. Multiplication tables. The information students can glance at when they need a reminder or a hint.
But here’s the problem: I teach music. Students rotate through my room once a week. They don’t have desks. In a regular classroom, teachers can tape important references right to a student’s desk, giving them a personal wall that teaches. But in music class? We’re constantly moving, and working in different configurations. Traditional “walls that teach” are either too cumbersome to put up and take down for each class, or they’re not relevant to what that specific group needs at that specific moment. For example, if I teach my students solfege in 1st and 2nd grade and chance to note names by 3rd grade, I potentially risk confusing 1st or 2nd grade students by having a wall that teaches aimed for 3rd graders.
The Xylophone Problem
Let me give you an example I implemented in my classroom. I do a lot of improvisation with my students, and one of the first things I wanted to do was label the pentatonic scale on a diatonic xylophone. Sure, I could remove the bars students shouldn’t use, but I found that with a visual guide, most students inherently understand which bars are supposed to be hit. I can still remove bars if a particular student needs that additional support, but the labels give most kids what they need.
The solution? An adjustable bracket system with magnetic arms that allows me to label xylophone bars with solfege. Colorful tiles, matched with boomwhacker colors hover right above the bars students should use. It’s a personal reference, right at the instrument.
But it turned out the process of making these xylophone labels presented a solution to solingd a much bigger problem than labeling my xylophones..
Before I discovered 3D printing, I was subject to the whims of my budget. There are rolling racks that let students play xylophones while standing and using a music stand - perfect for first and second graders learning to read music. But these carts are expensive and take up enormous amounts of space. My music room isn’t tiny, but space comes at a premium because I do a lot of folk dancing.
Without these carts, I had students pair up - one student would “hold the music” for the other student. This was productive for some students, but if a pair had a student with marginal abilities, attention, or focus, both students in the pair would suffer. Students could try to read music off the floor, but that wasn’t really effective either. It was always a battle, trying to find the optimal way to get my first and second graders to play xylophone while reading music.
The 3D printed solution? Magnetic clipboards that attach to the xylophone itself. I printed one for each of my xylophones, and now I’m planning to print 14 more of these so we can do something I couldn’t do before: take my third grade recorder class outside on nice days. Students can clip their music analysis to the wire fence surrounding the school property and practice outside while standing. A simple tool enabling a learning experience that wasn’t possible before.
The Recorder Clip: Dual-Purpose Design
My next tool was a clip that mounts to a recorder to label the notes B, A, and G. This tool does two things at once: it physically prevents students from putting their right hand on top (a common beginner mistake), and it provides a visual reference for the note names.
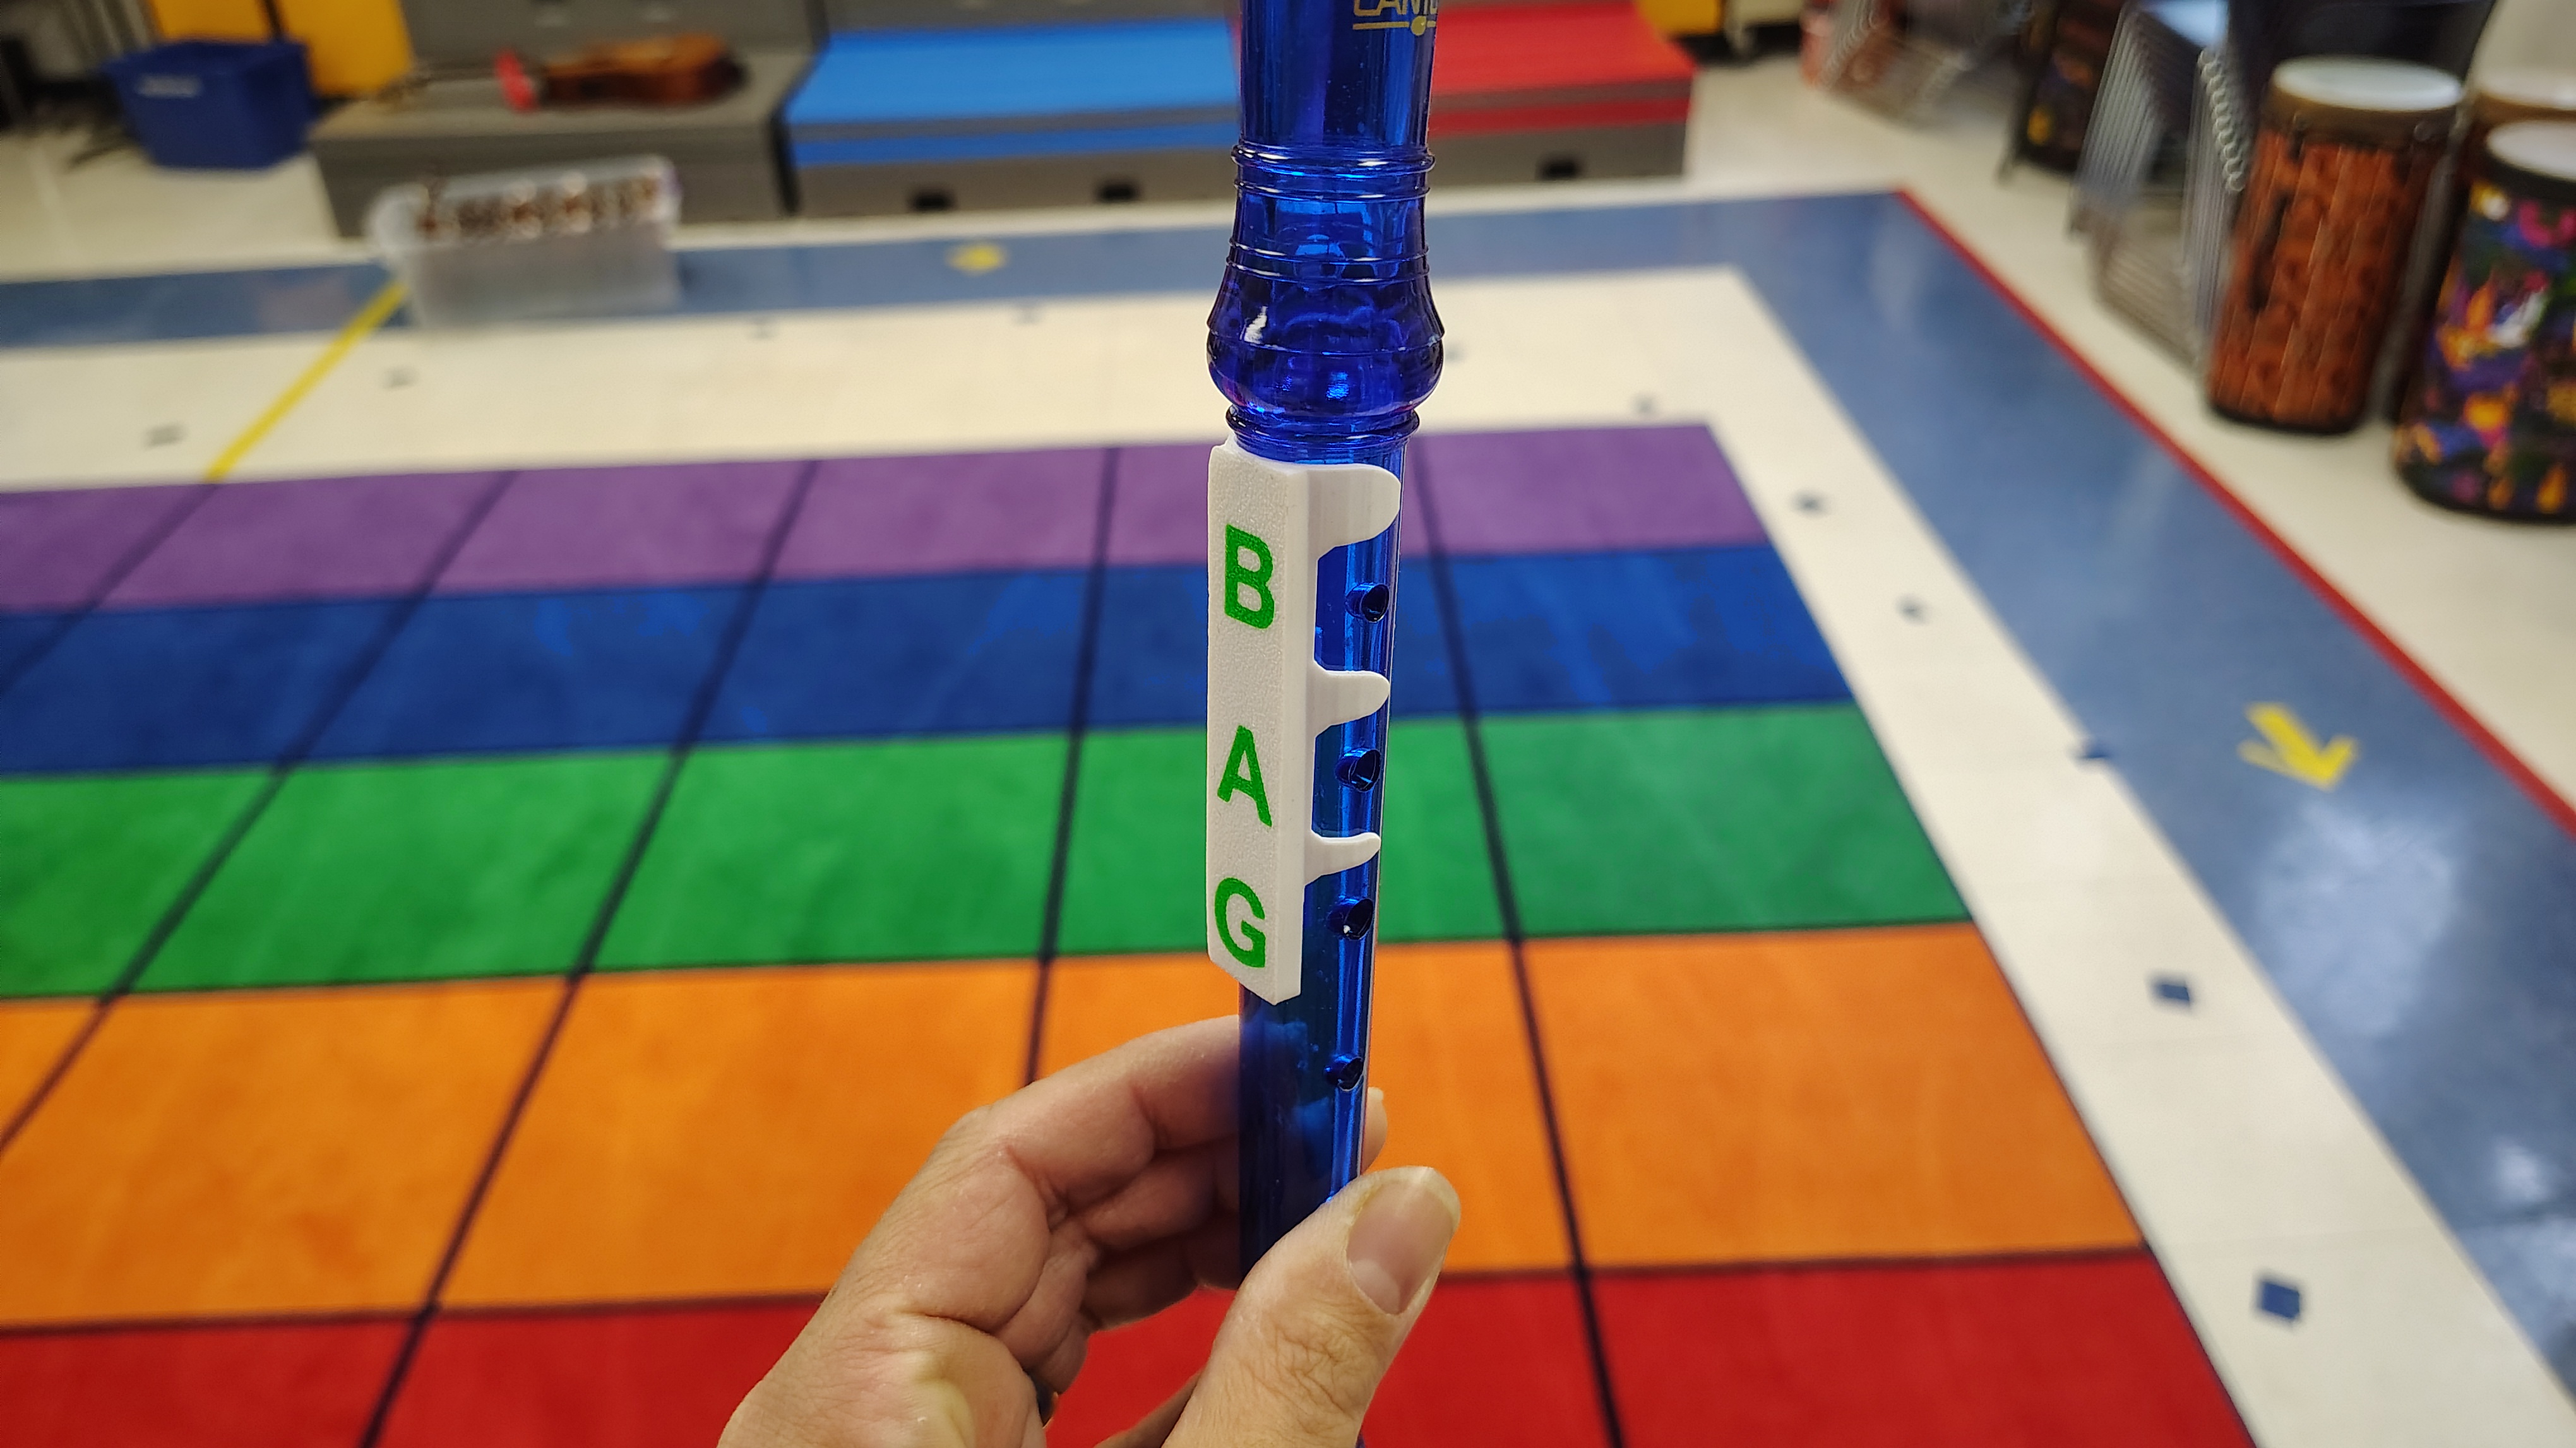
But there’s something deeper happening here. When I ask a marginal student in third grade “what letter note are we looking at,” they might give a completely unrelated answer without this guide. But with the labels visible on their own instrument, they have an extra chance to recognize that the correct answer is probably a letter. The guide doesn’t just show information, it helps students understand the type of answer they’re looking for. It’s reducing cognitive load and providing scaffolding, right where they need it.
I print one of these clips for every student recorder. It’s not a special accommodation - it’s a universal tool that helps everyone. Eventually, when they fall off, students have internalized these three ntoes and proper hand position.
The Note Shower: Rethinking Whole-Class Response
Here’s another example - the note shower. It’s a really simple manipulative that allows a student to highlight a specific note letter in the diatonic scale. I made this one specifically with Universal Design for Learning in mind, because it helped my students connect to the idea that the music alphabet is a repeating loop as opposed to an A-Z line.
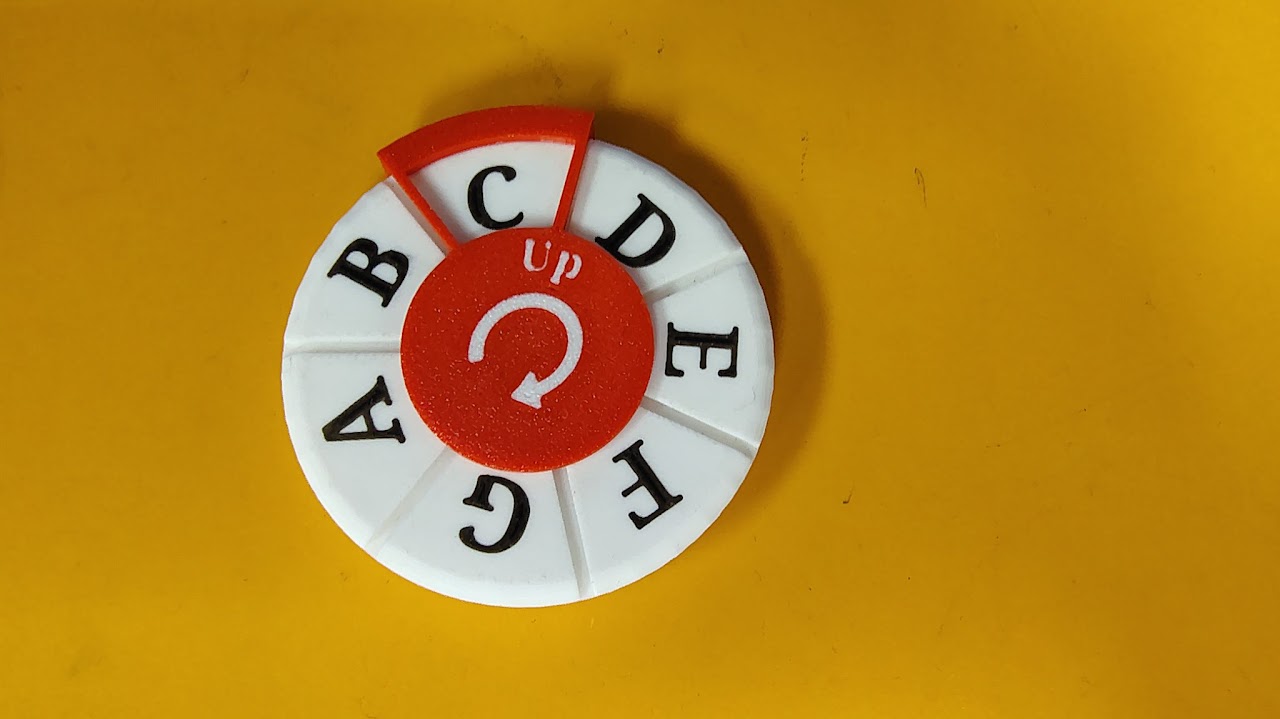
But more importantly, it allows all of my students to express their answers at the same time.
You might ask: “Why not just use whiteboards?”
Here’s the thing about music class - it’s different than a regular classroom. Routines that work in a regular classroom might not work in a special that students only have once a week, if that. When I give out whiteboards, there’s still great inertia from many students to answer or stay on task. They become a distraction as much as a tool. The physical effort needed to turn a wheel is so small, while 1st grade or 2nd grade students might find the act of uncapping their marker, writing an answer and then capping the marker again while remaining on task to be difficult.
A music classroom needs different solutions. We can use physical manipulatives to tear down barriers and allow marginal students to express their learning just as easily as high performers. Using these allows me to provide instant feedback, helping me identify who actually learned the concept.
(And yes, the note showers look like fidget spinners, but I put a washer on them to prevent them from turning into toys.)
Was This UDL All Along?
Although I was in the middle of a masters degree in educaiton at the moment, I didn’t consider Universal Design for Learning when I first started creating these tools. I was just pursuing my passion for technology and design and applying it to my job. My driving principle was simple: increase information given while reducing distraction.
But looking back, I was doing UDL without knowing it. I was creating:
- Multiple means of representation (visual labels right on instruments)
- Multiple means of engagement (manipulatives that reduce frustration and increase access)
- Multiple means of action and expression (tools that let all students participate simultaneously)
The beautiful thing about 3D printing is that it lets you create these supports universally. I’m not singling out struggling students. Everyone gets the recorder clip. Everyone gets a note shower. Everyone has access to the labeled xylophones. If one of them breaks, I just make another. These aren’t accommodations - they’re just better tools that work for everyone.
Three Categories of Support
As I’ve developed more tools, I’ve realized they fall into three categories:
- Personal tools - Everyone has one (note showers, recorder clips)
- Equipment-specific - One per instrument (xylophone mounts - I have one for each of my ten xylophones)
- Shared reference - Wall decorations and displays (which I’m also 3D printing)
This framework helps me think about what to design next and how many I need to print.
Why I Don’t Sell These
Many of my colleagues have asked me to sell these designs. I don’t, and here’s why:
These systems are really supposed to be personalized, and they can break. My goal isn’t to become a vendor - it’s to provide the technical know-how to a wide assortment of educators so they may be inspired and try designing things for their class as well.
When you design your own solutions, you can customize them for your specific students. Maybe you have an oddly shaped xylophone, or maybe you don’t have any at all! You understand how they work, so you can fix them when they break or improve them when you discover a better way.
The Practical Side
I’m fortunate that my school purchased 3D printers, and I’ve been given high priority access to the large printer. I also own one at home. The filament costs can add up, but my school purchases this for me as long as I’m using it for school-related projects. 3D printing filament is relatively inexpensive for the quantity of products you can make
The biggest expense? Magnets. The truth is, I probably use too many magnets in my builds and it’s something I’m planning on trying to improve in my models. That said, they’re incredibly handy in unique ways - like those clipboards that attach to wire fences for outdoor learning.
It should also be noted that all of my designs were iterated upon and are the result of a number of failures before arriving at what you see. The results in the photos aren’t first attempts. They’re the product of multiple iterations, and they will continue to be iterated upon. That’s part of the learning process.
Getting Started: My Advice
When educators come to me and ask how to start with 3D printing, here’s what I tell them:
Start by printing something from a freely available online model to fix something in their house or classroom. Go make a custom nameplate for your classroom using Makerworld. Get comfortable with the technology by making something useful right away. Or not! Many people end up making useless junk when they first start printing (I certainly did), but this process is essential for first time printers as you learn how to load filaments and troubleshoot your printer.
Learn Bambu Studio and Tinkercad. These are accessible tools that don’t require years of CAD experience. There are many other slicers and CAD programs worth looking into.
Explore parametric models on sites like MakerLab. These are models where you can customize a 3D design by simply adjusting parameters like “height” or “number of arms” without needing to design from scratch. You can even design your own parametric models using AI now. I create labels for my students recorders using AI to generate a script for OpenSCAD and then manually typing their names into the script.
Start small and practical. 3D printing is a skill you learn through practice - but it doesn’t take much practice before you can make great models.
And here’s my progression for music teachers specifically:
When trying to make custom items, start by labeling. Work towards design. Then solve problems.
Begin with simple labels and reference materials using sign maker modelers. As you get more comfortable, start designing custom solutions. Eventually, you’ll find yourself solving problems you didn’t even know you could solve - like taking your recorder class outside on a beautiful day.
Beyond the Music Room
Here’s what I’ve discovered: You can make unlimited props. You can create disposable musical instruments. You can stretch your budget in ways that weren’t possible before.
But most importantly, you’ll learn this exciting technology and maybe find a use for it in your own life to make things better for everyone.
That’s the real goal. Not just better music education - though that’s wonderful. But empowering educators to become makers, designers, and problem-solvers. When teachers learn to design solutions for their classrooms, they model the kind of creative, technical, innovative thinking we want our students to develop.
The xylophone mounting system, the note showers, and recorder clips mentioned in this post are available as free 3MF files on this site.